
A top and bottom box has two separate parts: a lid that lifts away and a base that holds the contents. In gift packaging, the same structure is often called a lid and base box or a two-piece rigid box. The terminology describes the opening; it does not, by itself, specify the material, dimensions, lid depth or interior.
This guide focuses on rigid paper presentation boxes. Use it to prepare a clear specification for a gift set, cosmetic product, jewelry item or retail collection. To see Yiwen’s sample designs and request manufacturing, visit our custom top and bottom box product page.
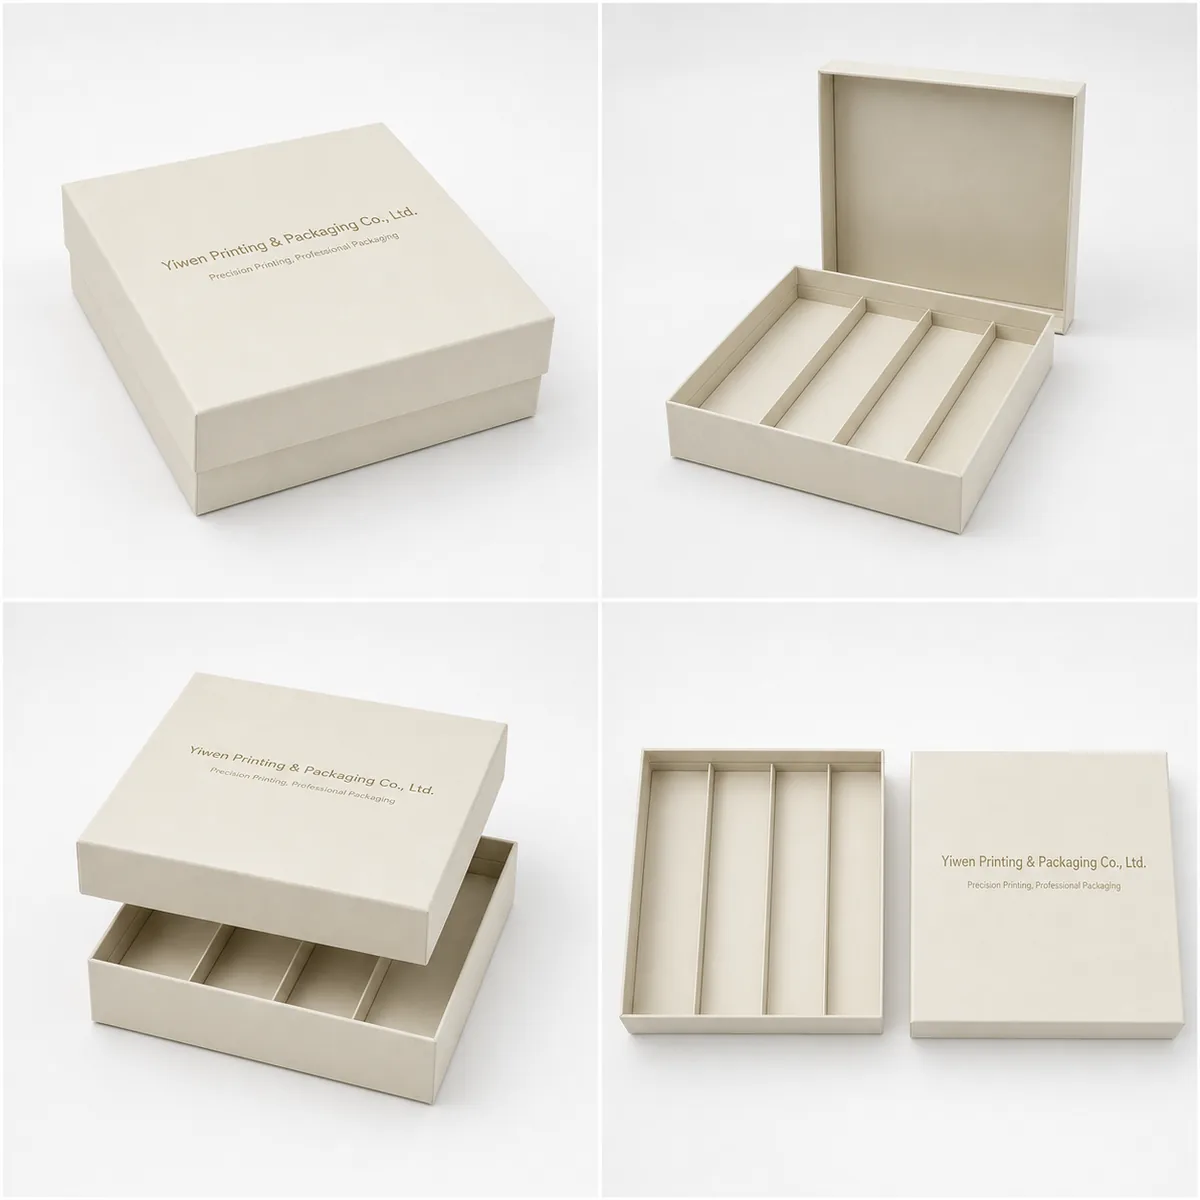
Are top and bottom boxes and lid and base boxes the same?
For the lift-off structure shown here, yes: the top is the lid and the bottom is the base tray. You may also encounter “base and lid box,” “lift-off lid box” or “two-piece gift box.” When speaking to a supplier, attach a photograph or sketch rather than relying only on the name.
These terms also appear in descriptions of corrugated shipping packaging, plastic containers and folded paperboard boxes. Two quotations using the same name can therefore describe different constructions. Ask whether the box uses a formed rigid board structure with a paper wrap, a folded carton, or corrugated board. The choice affects presentation, assembly, storage and how the complete package should be protected.
A tuck-end carton is a different opening structure: its top and bottom flaps remain attached to the carton. If you are comparing it with a rigid gift box, our rigid box versus folding carton guide explains the broader structural choice.
How the two-piece rigid structure works
The lid and base are formed separately and covered with the chosen wrap. The cover fits over the base, while the interior may be an open tray or may contain dividers and inserts. The wrap contributes to the finished appearance, so the dimensions and opening fit need to be reviewed on the finished sample.
Because the lid is completely removable, the user can view the contents from above. This can suit a coordinated set where several items should be visible together. It also means the lid needs somewhere to rest during opening. Consider the setting in which the recipient will unpack the product, and whether an attached cover would be more convenient.
A presentation box is part of the package, rather than proof of shipping protection. Review product fragility, movement inside the box and any outer carton or cushioning needed for delivery. Avoid choosing a structure only because it looks substantial in a photograph.
Specify internal dimensions before external dimensions
Measure the actual product at its widest points. Include pumps, caps, handles, accessory bags and any protective wrapping that will remain inside the box. Record length, width and height with units, and explain which dimension corresponds to each side of your intended layout.
Internal dimensions describe usable space inside the tray. External dimensions describe the finished outside of the package. They are not interchangeable: the board, wrap and insert occupy space. Clearly label any measurements taken from an existing box, and say whether they were measured with the lid on or off.
For a multi-item set, provide each item’s dimensions and a simple layout. For example, a hypothetical set containing two bottles and a booklet needs more than the combined bottle widths. The partitions, booklet position, clearance above the caps and access for removal all need to be considered. This is a planning example, not a fixed Yiwen specification.
There is no universal clearance that works for every product and material. Send the measurements and intended arrangement, then confirm the proposed internal space with a sample. Where fit is critical, use the actual product rather than a drawing alone.
Choose lid coverage and opening feel together
A deeper cover can extend farther down the base. A shallower cover leaves more of the base side visible when the box is closed. State the appearance you want in a sketch or reference photo, including whether the lid and base should show matching artwork or contrasting colors.
Lid depth affects where a user can grip the base. A wide, smooth box with a deep cover may feel different to open than a narrow box with an exposed base. Test opening with the intended contents inside, using the finished wrap, rather than judging an empty unwrapped structure.
Review how easily the lid lifts, whether it sits evenly on all sides, and whether the wrap catches during repeated opening. A cover that feels tight is not automatically more protective, and a cover that lifts easily does not establish that the box will stay closed during shipping.
If closure security is important, describe the handling conditions in the brief. Compare the complete packing arrangement, or consider an alternative opening structure. Do not assume a removable lid has the same closure behavior as a hinged magnetic box.
Plan inserts around retention and product removal
Dividers create compartments and can help organize a set. Shaped inserts position individual products. The useful question is what each item should do inside the package: stay upright, avoid contact with neighboring items, present a label forward, or lift out without difficulty.
Measure the product area available after the insert is fitted. Check that caps and accessories clear the lid, and that there is enough finger access or another agreed method for removal. An attractive layout can still cause problems if the recipient has to pull hard on a fragile product.
Match the insert specification to the contents and intended use. Material, thickness, construction and surface appearance are customized; the choice should be confirmed in the quotation and sample. If you have not selected an insert material, describe the product’s weight, fragile areas and desired presentation.
Yiwen’s box assembly and partition-fitting videos show workshop steps associated with this structure. Use the finished sample to assess your own arrangement; a production video does not establish a tested performance rating for a different product.
Connect the printed wrap to the structure
The lid and base have separate artwork surfaces. Decide which panels will be visible while the box is closed, partly opened and fully opened. If a design should align across the two pieces, identify those positions before preparing the final artwork.
Keep important text and logos away from edges or wrap areas that may become difficult to read. Mark inside printing, finish positions and orientation clearly. A digital picture of the assembled box is useful for discussion, but it does not replace the production dieline and artwork review.
Provide color references and explain which parts of the appearance are essential. Printed patterns, selected papers and surface finishes can create different results. Review the agreed combination on a physical sample, particularly when the lid and base should look consistent beside one another. Our artwork and dieline checklist helps organize the files.
Compare opening structures before choosing
A lift-off lid exposes the tray from above and separates completely from the package. A magnetic book-style box keeps its cover attached. A drawer box uses a tray that slides within a sleeve. These are different ways of presenting and accessing the contents.
Choose around the product layout and the user’s handling sequence. A set viewed all at once, a presentation with artwork inside the cover, and a product pulled out of a sleeve may call for different structures. Discuss where the package will be used, how it will be stored and whether it needs additional protection for delivery.
Compare quotations using the same dimensions, quantity, printing, finishes, inserts and packing assumptions. A price difference between two structures may reflect a different specification. Check the proposed sample and the complete packing arrangement before deciding which option fits the project.
Sample approval checklist
Review the sample in the same sequence that your packing team and customer will use. Put the real contents inside, fit accessories, close the lid, open it again and remove the products. Record the agreed measurements and any changes in one approval document.
- Confirm the usable internal space, overall dimensions and lid depth.
- Check that the tray and cover sit squarely and that the lid can be lifted comfortably.
- Review inserts, product movement, clearance and access for removal.
- Check wrap edges, visible surfaces, printed panel orientation and agreed finishes.
- Review protection, export carton packing and the intended handling conditions.
- Confirm which sample and artwork files are approved for production.
These are practical approval checks, not a certification or standardized test result. If your project requires a particular transit test or product-contact requirement, state it before the specification is agreed so the appropriate requirements can be reviewed.
Information to send Yiwen for a quote
Send the product dimensions and weight, item layout, preferred lid coverage, insert requirements, quantity, artwork or design reference, finish expectations and delivery destination. Say whether the packaging is for retail display, gifting or ecommerce delivery. Include an existing sample reference if you want a comparable opening feel.
At Yiwen, sizes and materials are made to order. The minimum order quantity is 500 pieces. Sampling takes 7 days after design requirements are confirmed, and production takes 21 days after sample and artwork approval. Shipping and destination transit time are quoted separately.
Review the lid and base box samples and customization options, then request a quote for your two-piece rigid box. If the material or layout is undecided, send the product information first so the discussion can begin with fit and use.